Rayla Cosplay (The Dragon Prince)
- Ash

- Oct 3, 2018
- 9 min read
COSPLAYERS, PLEASE NOTE!!!! ALL PRICES LISTED ARE IN AUSTRALIAN DOLLARS (AUD) AND FROM SEPT 2018
After watching the new Netflix show "The Dragon Prince", I fell in love with the Moonshadow Elf Rayla, and after some research, I discovered that she was yet to be cosplayed. So I took it upon myself to make the templates and share my process...
Within two days of crafting, I'd produced this cosplay...


WHAT I MADE THE COSPLAY OUT OF: The total budget for the whole of this build was $50, of this, I ended up spending a total of $35.19, all other materials were sourced or reused/repurposed from other cosplays. A large part of my cosplaying is minimising all of my spendings to allow for me to have enough money to still attend cons. For a helpful blog post regarding cost cutting and cosplay saving hacks, check out my post here... https://zoze12368.wixsite.com/art3miscosplay/blog/101-cosplay-saving-tips The materials I used included (prices listed next to items bought for this build):
- 0.5m of 'Black' Pop Poplin Fabric ($1) * - 2m 'Obsidian' Pop Poplin Fabric ($4) - 1m 'Forest' Pop Poplin Fabric ($2) - White leggings ($6)* - RIT Dark Green fabric dye ($8.49) - Brown Leather Belt ($5.60)* - Black Leather Belt ($2.80)* - 6m Light Green Ribbon (2x $1.49) - 1m White and Silver Swirl Ribbon ($1.20) - Black slip on shoes ($3.50 at Big W)* -Open-End Zips or Velcro ($3-5.99)* -White Acrylic Paint ($3.50 per 100mL tube)*a
-PVA glue* -Black Elastic* -Plastic offcuts* *items that were sourced, price wasn't taken into account within total spendings I also used a small amount of foam clay, and 5mm EVA foam that I already had, I purchase my foam for roughly $19 per 1m^2 form Lumin's Workshop, and I also purchase my foam clay from them so I highly recommend them for cosplay materials, and they now ship internationally!!
HOW I MADE THE COSPLAY: THE SHIRT...


1. To begin with, I found a good fitting T-shirt that I already owned, ensuring it wasn't made out of stretchy fabric, I traced it into my 'Obsidian' blue fabric twice, to create a shirt front and back template.

2. I then sewed along the side (excluding the sleeve holes) and the top (excluding the neck).
3. After putting the shirt on and making necessary adjustments, I cut a V for the collar, starting at the edge of my neck sewing, dipping to the preferred depth before mirroring backup to the other area of neck stitching.

4. I then cut a large triangle out of the same 'Obsidian' fabric, the length of the shirt, and sewed it, at the top, along the V- collar line, to the front of the shirt. Cutting off any excess fabric, to keep the collar as the prefered V-shape.

5. After cutting a wide length of the 'Forest' fabric, I sewed it down as I hem across the loose edges of the triangle chest piece. Using the same 'Forest' Pop Poplin fabric, I cut a rectangle and sewed it down around the inside of the collar. Putting the shirt on for adjustments to the collar, to get it to fit my neck like that within the reference material.


6. To add details to the shirt, I hot glued the Light Green Ribbon across the top edges of the collar, both on the inside and out. I accompanded this by using Acrylic white paint to replicate the pattern seen within Reference Figure 3 across the green hem, on the triangle chest piece of fabric. White the acrylic paint was still wet, I rubbed across it with my fingers to blend it into the green fabric and soften the details.
THE PANTS... 1. To begin with, I turned the white leggings inside out, before following the instructions on the dye packet to dye the leggings.

2. Once the leggings were dyed and dry, I chose to put them on and go down the leg with the same White Acrylic Paint technique to add the lighter detailing as seen within the reference images, but this step is purely optional and dependent on how your dye job comes out. NOTE: When drying a dyed garment or piece of fabric, do NOT use heat to speed up the dying process, it causes splouches of colour to appear!!

THE FABRIC BELT... 1. To begin with, I measured my waist, allowing for me to correctly cut the 'Forest' fabric to length, with double the width intended for the belt.


2. The fabric was then hemed into the correct width, and the 'Obsidian' fabric was cut to the same length and width of the now hemed belt base.
3. The 'Obsidian' Belt detailing was hemed to the desired width, and sewn onto the green base belt. Using the same acrylic white painting technique used for the pattern on the green hem of the triangle chest piece, I recreated the mater again across all of the green elements.

4. I chose to use an open end zip, but velco works just as well to connect the two ends of the belt. This connecting element does not have to be the neatest as it's hidden by the triangle chest piece.
THE LEATHER BELTS... 1. I put on the leather belt to match that within the reference image, adding a new hole if the belt did not originally fit me. Then tested lengths for the addition black belt. Before cutting these pieces with scissors. I then used hot glue to attach the edged of the black belt to the brown,


2. I created the moon template out of plastic off cuts from a packaging tube for foam clay. I did this by creating two circles, one slightly bigger then the other and glung them into one another. I then made a circle 75% the size of the smaller framing circle, I attached this acorss on side, and moulded a small hemi-sphere of foam clay. I attached this to the belt with hot glue.
3. To finish the moon belt pendant, I painted the whole thing acrylic silver, except for the hemisphere of foam clay, which I painted with Ice Blue acrylic paint. Once the paint was dry, I sealed the whole thing with clear gloss nail polish.
THE OVER JACKET AND HOOD... 1. To begin with, the shirt created is used as a template to cut two back pieces out of the 'Black' Pop Poplin Fabric. These were sewn together and turned inside out. The shirt was again used as a template to create a front piece. This was then trimmed to the desired shape by hand, based off reference images, and then sewn using an inside seam. 2. The hood was templated and adjusted off a jedi robe I owned, but once fixed up, one side looked roughly like this.

3. The two halves of the hood were sewn together then flipped inside out, an internal seam was used to attach the base of the hood to the back of the collar.
4. A light green ribbon was hot glued around the edges of the garment, with additional details begin added on the from part of the jacket, leading to the underarms.
5. Sleeves were then added by cutting two diamonds of black fabric, sewing the top of each to one of the shoulders of the over-shirt, and then using a black ribbon of the same fabric to fasten around the bicep, from one edge of the diamond to the next.


THE SHOES...
NOTE: Images Below
1. A pair of simple black slip-on's were purchased. A large rectangle of dark blue fabric was cut (long enough to reach from one;s ankle to the middle of their thigh). 2. Hot glue was applied around the edges of of the sole of the shoes, and the fabric was lined up and pressed into it. 3. The fabric was then wrapped around the leg of the cosplayer, held in place with an elastic band while adjustments were made to the piece of fabric so no excess was left when each edge reached the other. The fabric should also end just before the cosplayer's knee. 4. Elastic, a zip, or velcro were then used to attach and detach the extension of the shoe to itself. 5. All steps were then repeated for the other shoe.


THE KNEE GUARDS... NOTE: This whole process needs to be repeated again for TWO knee guards as it is just the process to create one.
1. A diamond of foam was cut from 5mm foam. This diamond was wide enough to go from one side of my knee to the opposite side. 2. Hot glue was applied around the edges of the whole piece of foam, before the glued edge of the foam was then pressed into a piece of dark blue fabric that matches that of the boots. 3. Once the got glue set, the fabric was trimmed to allow for a 5mm edge around the foam. The foam was then turned so the non-fabric side was face up, hot glue was then applied around the edges again. The fabric edge was then folded over and glued into place.
4. Two 2cm wide pieces of 'Forest Green' Pop Poplin Fabric were cut, and hot glued around one side (two touching edges) of the top of the foam and fabric diamond. A smaller diamond was cut out of brown fabric scraps and hot glued into the middle of the diamond. 5. For attachment, a piece of elastic was glued to one inside edge of the diamond. This was then measured to a side where it would sit tight but comfortably around my knee. The elastic was cut to size and the other edge hot glued into the opposite inside edge of the knee guard.

THE ARM GUARDS...
NOTE: This whole process needs to be repeated again for TWO arm guards as it is just the process to create one.

1. I cut a middle blue fabric into a rectangle, and wrapped it around my arm, using elastic bands to secure it into place. As I adjusted it so that no excess fabric was left when the two edges touched, and it was still right, but comfortable, on my arm.
2. I sewed on a open end zipper for easy removal, but elastic or velcro does the job just as well.
3. For Rayla's 'binding' bracelet, I found a patterned white and silver ribbon at Spotlight. I cut that to side. I also hot glued two 'O' rings together in the shape of a Ven-Diagram, with a safety pin on the back. I used foam clay to shape the pendant into that I found within reference material. Once dried, I painted the pendant with silver acrylic paint, and ice blue paint for the small crystal, and sealed it with invisible gloss nail polish.

4. I then test fitted the ribbon with the pendant and arm guards, with some minor adjustments, they turned out like this...

THE SWORDS...
NOTE: This whole process needs to be repeated again for TWO daggers as it is just the process to create one. 1. To begin with, I used reference images found from the show, to sketch up (grey lead on paper) a life size version of the daggers. I cut this template out and checked it's soze against me in a mirror.


2. I used the template to sketch and cut two mirrored pieces of the hilt out of 11mm EVA foam (found for $10 at Kmart), then I used the same template to sketch the whole blade design into 5mm EVA foam (from Lumin's Cosplay). Repeating this sketching process, I traced half of the blade template once into the 5mm foam, and did the same with the opposite half of the blade template. 3. I used hot glue, to glue each half of the blade onto opposing sides of the base shape, with skewers between each piece of foam for support. I made sure roughly 2cm of skewer hung out from the hilt end of the foam blade.
4. I hot glued the two hilt parts together, with the skewer ends from the blades in the middle, ensuring the blade started where the hilt ended. I then went over all of my seams with foam clay, to ensure that it was a clean shape.
5. After attaching the circular details, that were cut out of 5mm foam, the prop was primed with PVA glue, then the blades were painted with silver and detailed with pearl black Acrylic paint ($6.99 at Spotlight?), and the hilts were painted black, and detailing added with Green Acrylic paint. Before sealed with a layer of clear gloss nail polish and clear satin spray.

HOW I FINISHED THIS COSPLAY OFF:
To finish off this cosplay, I needed to style my hair to match Rayla, and transform my facial features to resemble hers. To complete this look, I used a combination of a wig, make up, face paint and latex elf ears.

For my wig, I used a 80cm White wig ($9.90 from ebay), which I cut to shoulder length, and styled to have a middle part with Cheap Hairspray ($3.50) at Coles/any supermarket. I created some small horn templates, which I cut from 5mm EVA foam scraps and hot glued into the wig net. I recommend people are careful with this step as my horns weren't originally glued in symmetrically, and it took more effort then I care to admit to fix it.

For the purple face marks/war paint, I used Purple 'Dervian' face-paint ($7.99 from Spotlight), to create the two spiked designs, tracing down from my lower eyelids, over my cheek bones to mid-lip level. I barely used any of this paint so I recommend using any form of purple/dark blue facepaint you may already own and saving yourself the hassle of buying more. I sealed this paint with normal makeup setting spray.

To finish the look, I wore a pair of latex elf ears I'd purchased off ebay for $1.00. These ears had some small adjustments made, mostly it cutting small slits along them to assist with putting them on over any ear piercing I may have in my helix.
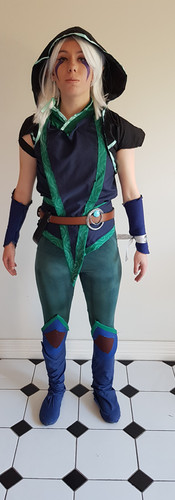
The Final Cosplay
After much work within two days, my final cosplay turned out like this...


Comments